Level Design
Tutorial (for Deathball 2.0 and above)
last updated August 18. 2004
There are some things you NEED to
add to a DB map, and some you CAN add.
You need to start Unrealed with this command line:
\UT2004\System\UnrealEd.exe -mod=deathball
This tutorial
presumes that you know how to work with Unrealed, if you don't know this, go
google for basic tutorials!
We are starting off with a finished map with no Deathball
actors, putting in the necessary actors step by step:
Necessary for
a proper Deathball match:
1. The Ball
2. Startpoints
3. Zones
4. Blocking Volume
5. Ball Reseter
6. The Radar
7. Radar Posts
Other stuff:
8. Events
9. Spectator and Replay Cameras
10. Team Jump Pads
11. Design Hints
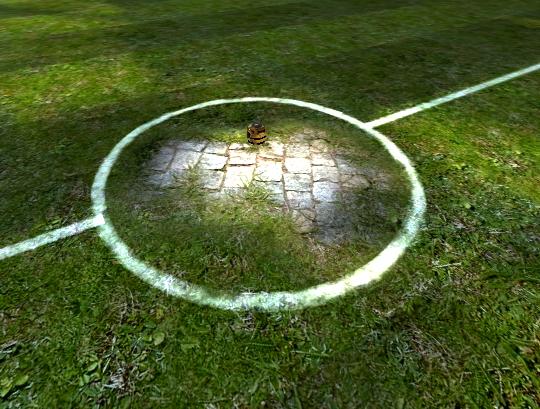
1. The Ball
Put the ball into your map, put it in the middle.

It's under NavigationPoint/jumpdest/jumpspot/gameobjective/xBombSpawn
There are 4 different DB_startpoints (navigation)
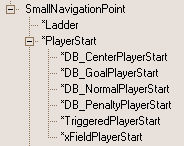
Every team needs one Centerplayerstart.
That's where one player of the team starts that was scored against. It has to
be close to the ball to make sure that the team has the ball.
Make sure it's not too close to the Ball, or you will get telefragged by it
everytime you spawn.
One Goalplayerstart, one player starts there, it should be in the goal. For penatly shots its important that its exactly in the middle and about 24-32 units in front of the line. And its also very important for penalties that the rotation is very exact. The keeper will be able to move on a line 90° to the view direction of the point. So make sure you use exact yaw rotation values there (0, 16384, 32768 or -16384; enter these numbers and you will see what they do). Also bots use the goalplayerstart to determine where the goal is, so don't put it anywhere but on the line, and it's gotta point away from the goal in a 90° angle, so the bots know from which side to shoot into the goal. Once again, if there is no Goalplayerstart in the goal, the bots will not know where the goal is.
PenaltyPlayerstart. That's where the penalty shooter will shoot from. Exact placement necessary. (No Penalties currently, but they are for future use) In the official maps they are 640 units away from the goal (which is about 11.5 meters).
Normalplayerstarts, thats where all
other players start, and where you start when you get killed during play.
Up to you where you place them, but make sure they are not inside the
penalty zone, otherwise a normal player could be keeper by accident.
And I'd suggest, don't spread them too much, having 'em all very close is better
since people can boost each other right away, which people like to do.
Also make sure you have enough. If there are more players than spawn points,
not all will be able to spawn, or some will get telefragged.
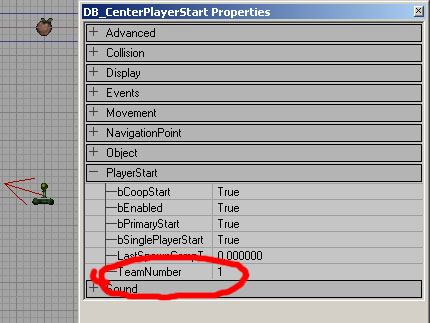
Teamnumbers need to be set.
0 = RED
1 = Blue
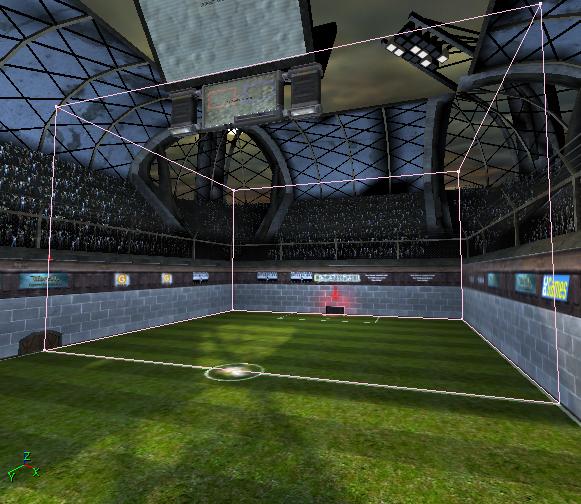
3.
Zones
There are 3 different zones, BUT we don't use zones, they are so bsp and lighting
unfriendly. We use volumes.
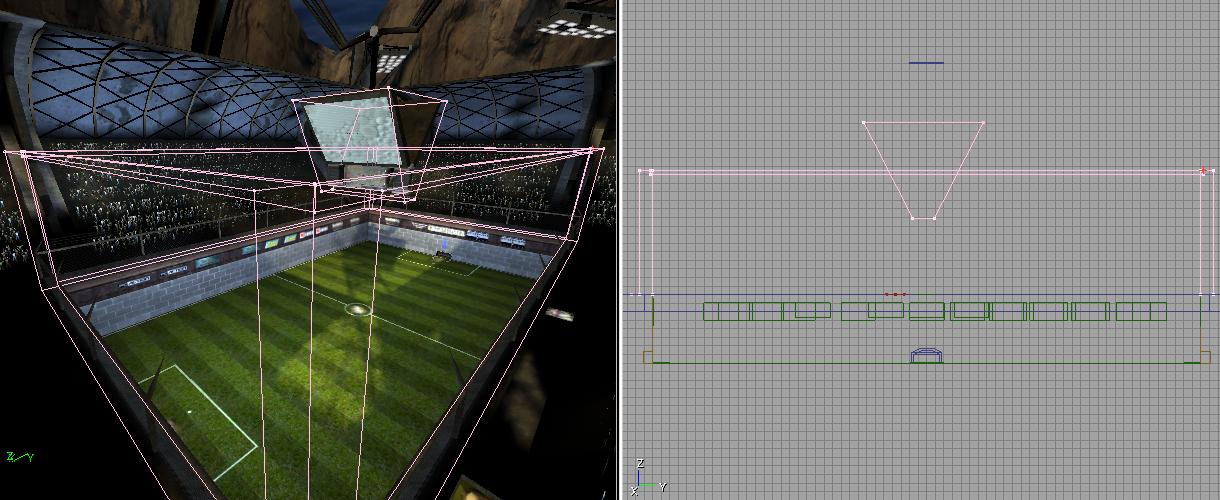
First the 2 halfs. 1 half is selected in the next pic. (Make sure you leave 64 units room between both half volumes, to make sure the ball is not in any half when its at it's spawn point)
The Penalty zone:
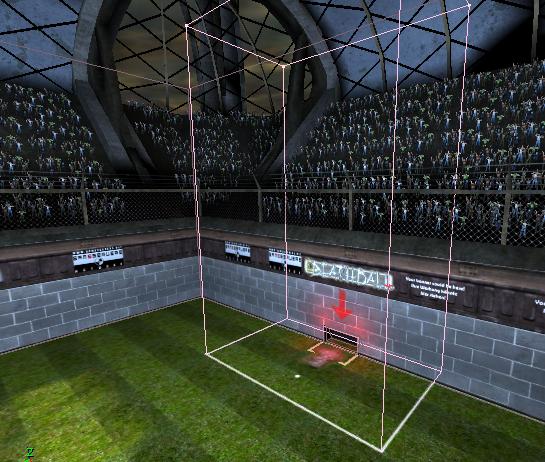
The Goalzone:
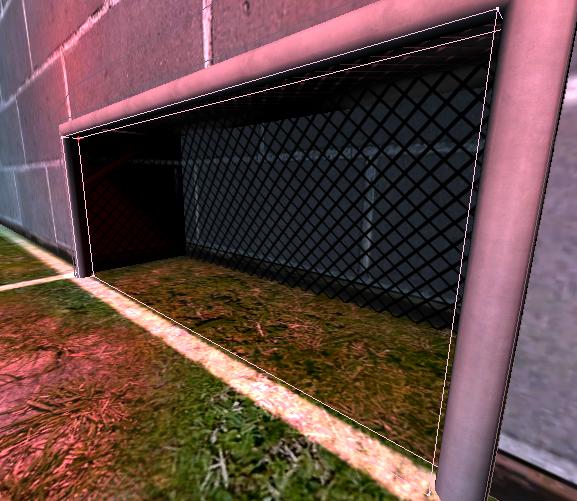
It's a goal as soon as the ball touches this volume. (Make it be 12 units behind
the line, otherwise it will also count as goal when the ball is still on the
line. When all rings have crossed the line its gotta be a goal.)
Make sure you got
appropriate lines on the ground for each zone.
Then apply your builder brush to it.
Right click the volume button, and select "DB_Volume"
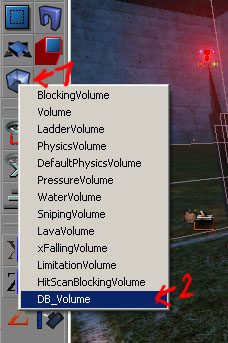
This makes your brush turn into a volume. Now open it's properties (f4) and select the appropriate zone type:
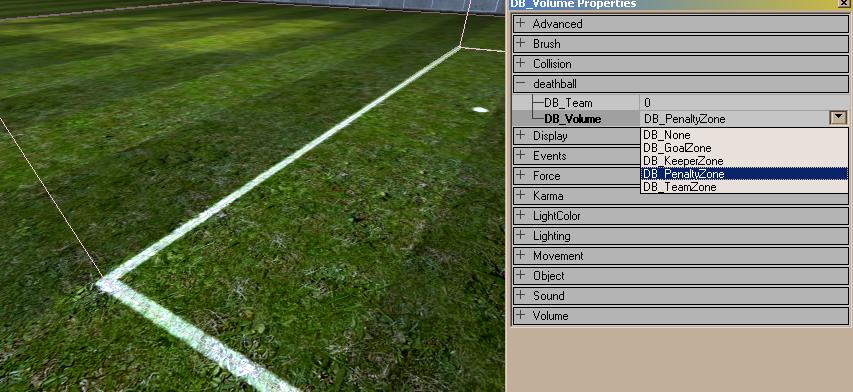
Again enter the number
of the team that owns this zone:
0 = RED
1 = Blue
(Ignore "DB_Keeperzone", it's from a very early
Deathball version, where we used this, but it's of no use now.)
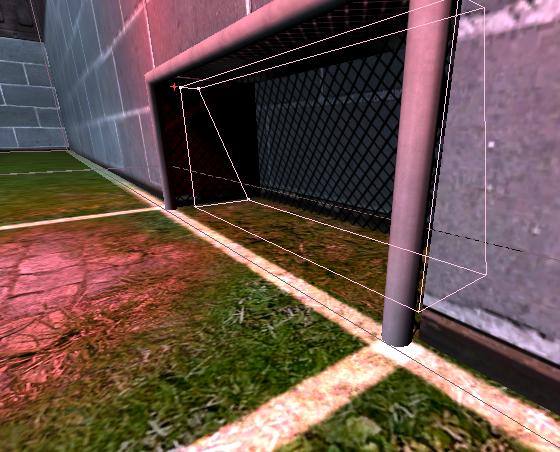
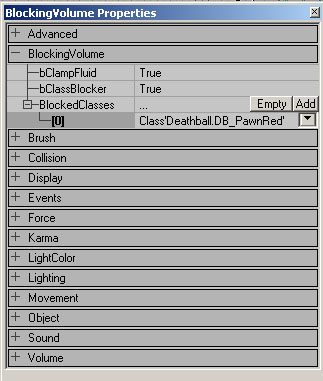
To prevent that you from running into your own goal as keeper (which happens quite often and is very annoying) place a BlockingVolume In your goal (Select it from the same place as the DB_Volume).
Now you have to setup up WHICH team will be blocked by it:
Enable "bClassBlocker".
As Blocked Classes select "DB_PawnRed" or "DB_PawnBlue"
from the dropdown menu. That's the team what will be blocked by it.
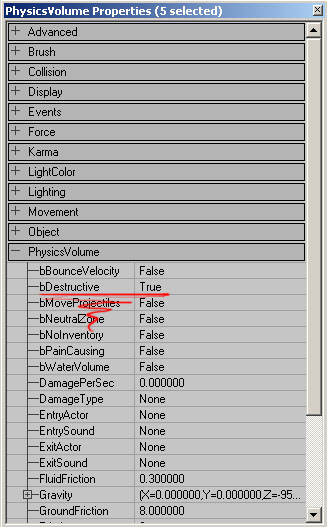
Surround any open spot of the stadium with Physic Volumes, so when the ball touches them it will be reset. If you don't have these the ball will leave the map and remain there for some time. Don't make them too thin, or the ball might go THROUGH them online (due to lag).
But it ain't working yet, you gotta set bDestructive to true.
Now it gets a little
difficult.
To make a radar, change to the topview, use a big grid setting (256 or so)
Now 'print' screen, and paste it into your graphic proggie.
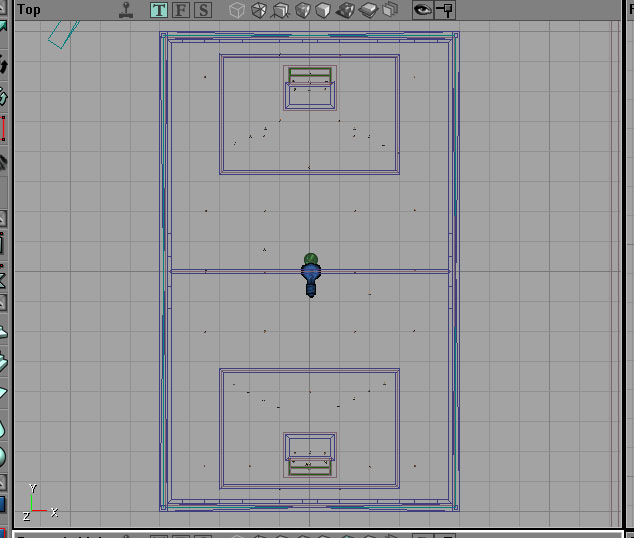
Well, then you have something like this. Now cut out exactly 16x16 boxes (or some other power of 2).
Then it looks like this:
Now scale the picture to 512x512.
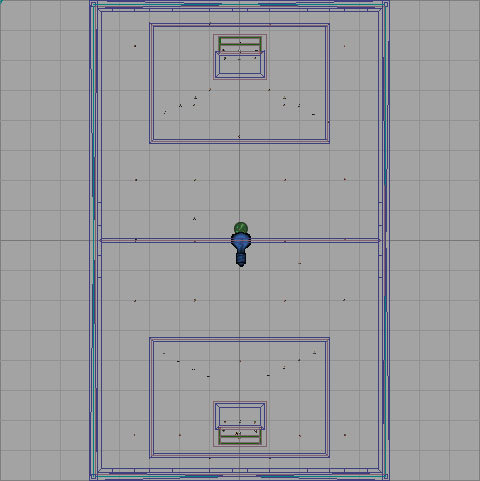
Next you need to turn on the grid of your graphic proggie. In photoshop it works like this:

Now configure your grid:
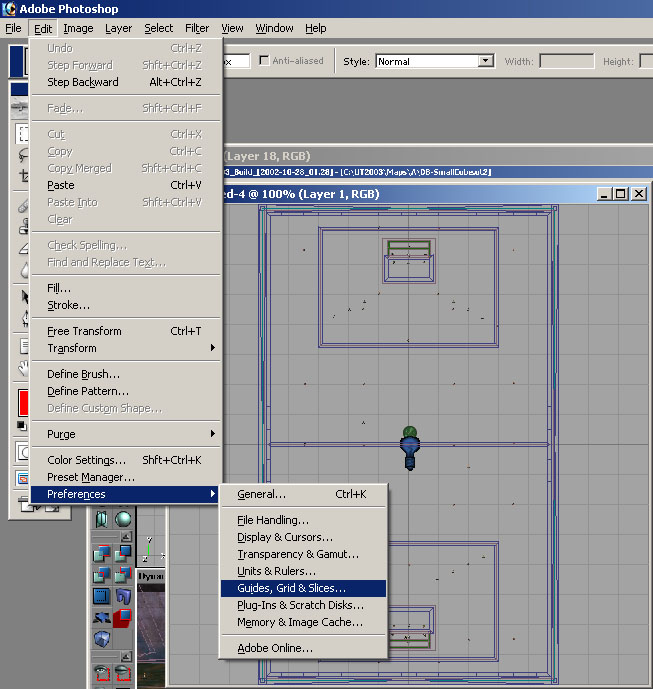
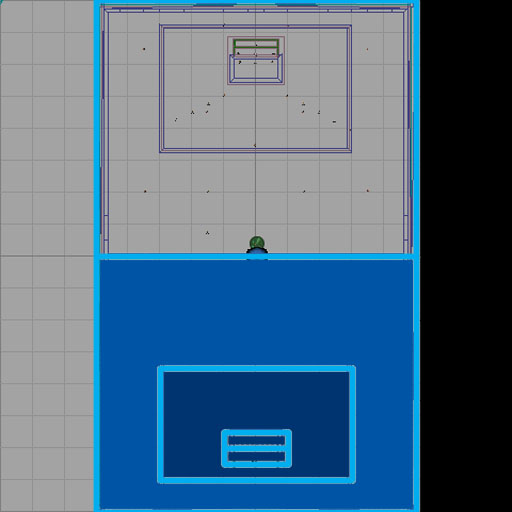
Choose a power of 2, like 32 or 16, then you get your grid applied to the Unrealed one, and it looks like this:

By holding shift
you can now paint on the grid. For painting small stuff like the zones and the
goal you better make the grid smaller (8 or so).
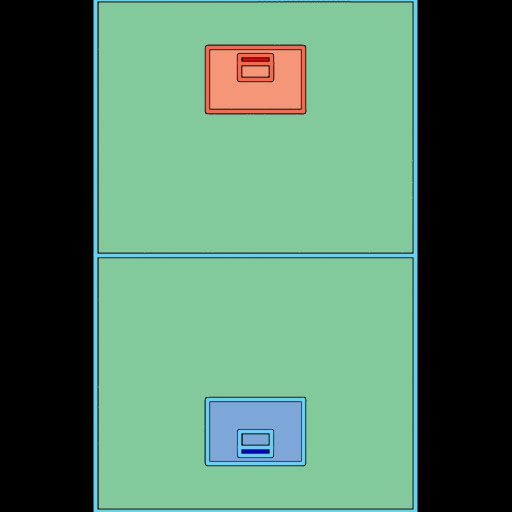
Here a work in progress pic:
In the end it can look like this (other map in the pic below):
Now you need to add
an alpha channel. Make the black stuff invisible, and have the pitch 70% visible.
That prove to be a good mix.
I found a good tutorial on how to do the alpha channel stuff here: http://thesprayshop.net/tutorials/tut_photoshop_alpha.shtml
When you import the graphic into Unrealed deselect mipmap and select Alpha.
Now you need to add the radarinfo actor to your map:
Doesn't matter where
you place it.
Now you gotta find out at which worldunit the top, left, right and bottom of
your pic is.
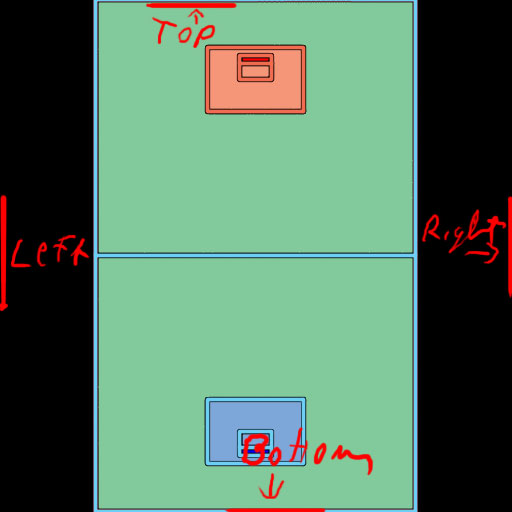
To make life easier, just center the pitch to the middle of the world, then all units are the same, like in this example:
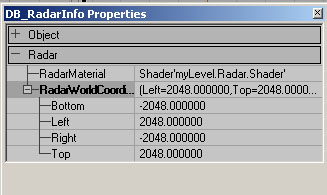
To find out what unit it is, just put an actor there. And in it's properties
check movement/location. Only X and Y axis matter here. Z is uninteresting.
(Values should be -4096 and 4096....see below, it's wrong in this pic)
Then use it a "radarmaterial" in the db_radarinfo actor.
PS: your level should be in the 8129x8129 proportion (or smaller), otherwise
the radar will be incompatible with other maps. You use the radar to play long
passes and some use it for boosting. If the radar is a different size you fail
at doing all this. Even if the map is smaller, use this size, just to be consistent,
or your radar might ruin the gameplay (!). If your map is longer or wider...well....
shit, isn't it? :P
To make the goal
posts visible in the middle radar, you need to add another actor. This is necessary,
that goal keepers see the goal in their back by looking at the radar.
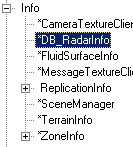
Just place a DB_RadarObjectPost actor in the post (located in the actor browser
under Actor >> Info >> ReplicationInfo >> DB_RadarObject).
Z axis dont matter, only X and Y.
They can also be used to mark other things, like the jumppads in DB-Chill.
The map is now playable, but there are more cool things you should add to make your map more interesting!
GoalEvent
-You can trigger
all kind of effects when a goal is scored.
-"BlueEvent" and "RedEvent" are triggered when the appropriate
team scores.
Same for "BlueEvent1" and "RedEvent1"
-The difference: "BlueEvent"/"RedEvent" gets used twice.
When the goal is scored and when the match restarts. This is to turn something
on and off (like an emitter)
"BlueEvent1"/"RedEvent1" only gets triggered once, so if
you want a sound played for example, use this.
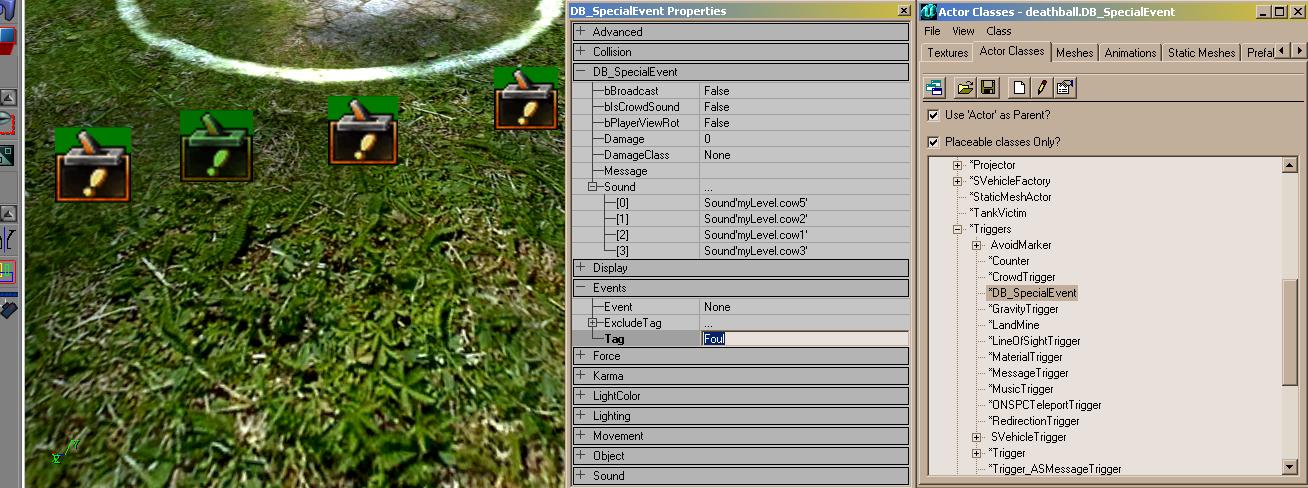
Crowd Events
To trigger realistic crowd reactions use our DB_SpecialEvent actor
Player gets killed
or missed chance: "Foul"
Successfull pass in enemy half and intercepting a pass: "pass"
Goal scored: "RedEvent1"/"BlueEvent1" (same as above)
The pic shows a "foul"
special event and 4 sounds that can get played. There will always be one that
gets randomly chosen.
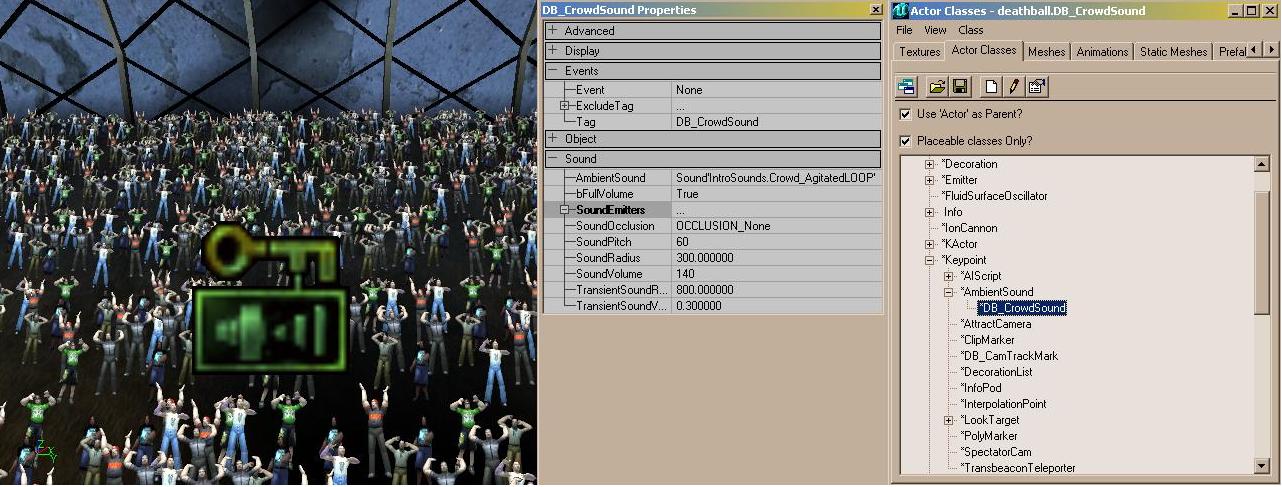
Crowd Ambient sounds
For crowd sounds
that play a constant cheering, you need our DB_CrowdSound
Just because this we have a "Crowd Volume" option, this one changes
the volume of the above mentioned crowd effects and of this ambient sound.
If you use the normal Ambient Sound it will always be loud, and people can't
turn down the volume, so just use this.
Post sounds:
So you get a sound
when the ball hits the woodwork.
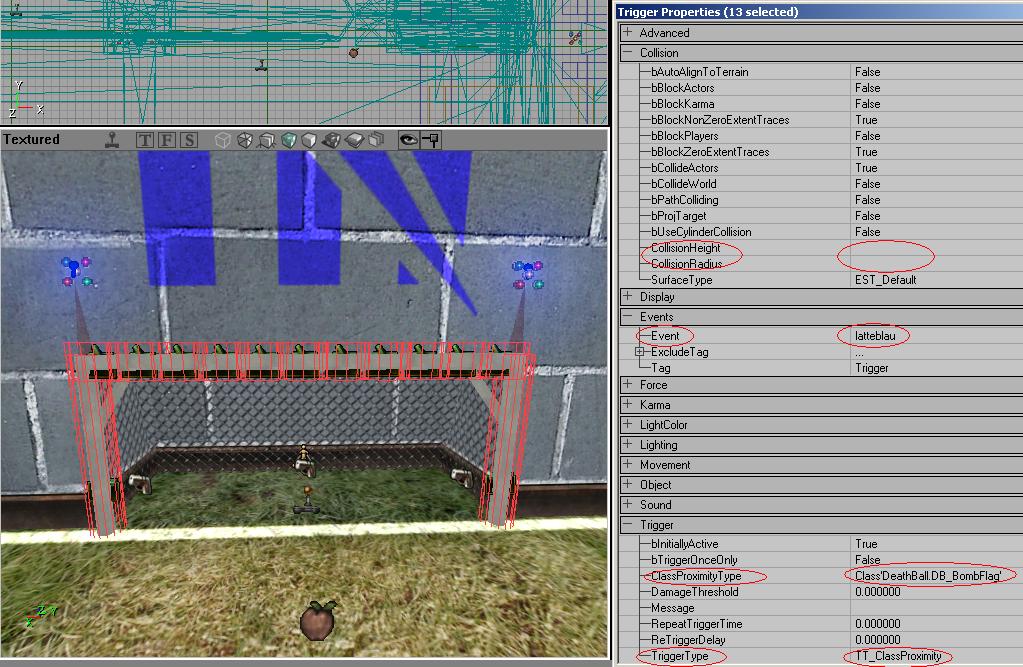
Turn on the radii view in your viewports

Now add triggers
(Triggers>trigger) so they cover the whole woodwork (don't make it too close).
Check pic below: With collision Height and Collision Radius you can set the
size, and the red cylinder shows it.
Then set the event
to:
Latteblau if its the BLUE
goal
Latterot if its the RED goal
This is important,
because otherwise the crossbar hits will not appear in the stats.
To make sure that the triggers only recognize the ball got to "trigger"
and set "ClassProximityType" to the ball (select the ball as described
in the very first point in the tut and click 'use'. And set TriggerType to ClassProximity.
So it only plays the sound when the ball touches the triggers)
Now we need actors
that play the sound. Add a DB_SpecialEvent (I added 2 as seen in the pic below
to get a more surrounding sound).
Set the Tag to Latteblau or Latterot, according to the triggers and the goal
colour.
Under object set it to PlaySoundEffect. Under DB_SpecialEvent under sound "add"
and "use" your desired sound (feel free to rip the ones used in the
official maps).

(Ignore the weird actors in the goal, they are from previous versions and of no use)
9. Spectator and Replay Cameras
You don't have to
do it, but it makes spectating much cooler that way.
-Add a DB_CameraScript (keypoint->AIScript) to the world.
Give it a tag (only needed when you want it shown on a Scripted Texture like
the big screen in DB-Cube (from 1.7 on))
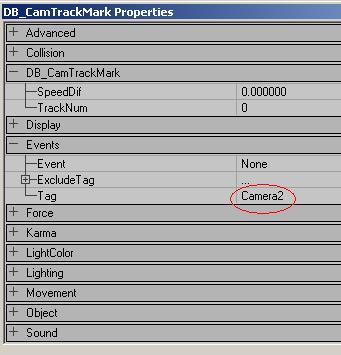
Add one or more DB_CamTrackMark (keypoint) to the world.
Set all of them to the same tag.
Set TrackNum in order. i.e. 0 connects to 1, 1 connects to 2, etc.
Set TrackTag in the DB_CameraScript to the tag given to those tracks.
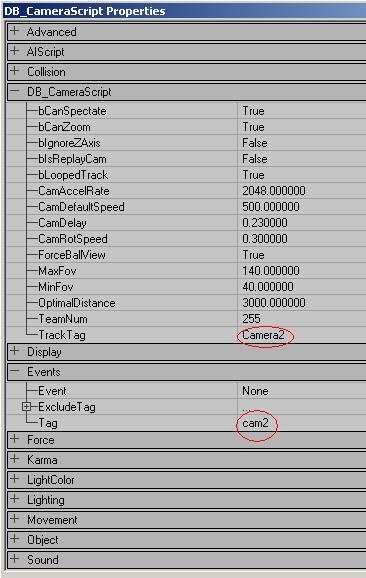
Options for camerascript:
-bCanSpectate: If
true, spectators can view from this camera
-bCanZoom: if true, camera can zoom else locked at FOV 90
-bIgnoreZAxis, camera always tries to get to the closes point to the ball, if
this is on it only tries to be close on X and Y axis.
-bIsReplayCam: If true, replays are shown through this camera. Only one camera
in level should have this as true!
-bLoopedTrack: If true, track is looped. i.e. camera can move from the last
tracknum to the first tracknum directly.
-CamAccelRate: How fast the cam accelerates on the track.
-CamDefaultSpeed: speed of camera on tracks in unrealunits/sec. Note that you
can set each CamTrackMark ->SpeedDif to have cam on certain tracks go faster
or slower than thus.
-CamDelay: cam delays every action by x secs to make movement look smoother
(not implemented in 1.7 yet)
-CamRotSpeed: Speed camera can rotate in radians/sec
-ForceBallView: Ensure that ball always stays in view, even if cannot rotate
fast enough.
-MaxFov: maximum FieldOfView (in degrees) cam can be.
-MinFov: minimum fov
-OptimalDistance: The optimal zoom distance. CAM will try to be this far away
from the ball in zoom, don't make it too small, 2000-3000 is a fair spectate
distance
Setting up Screen
that shows what a Camera is showing (big screen in pic below)
Now we need a tag for the DB_CameraScript to tell the texture from which camera to spec. Make sure these cameras have a low "optimal distance", otherwise it's hard to see something on the screens. 400-900 should be ok.
In the texture browser
go to file>new
As material class choose ScriptedTexture.
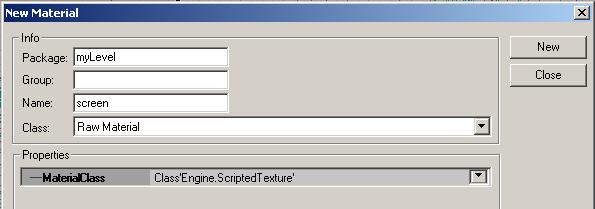
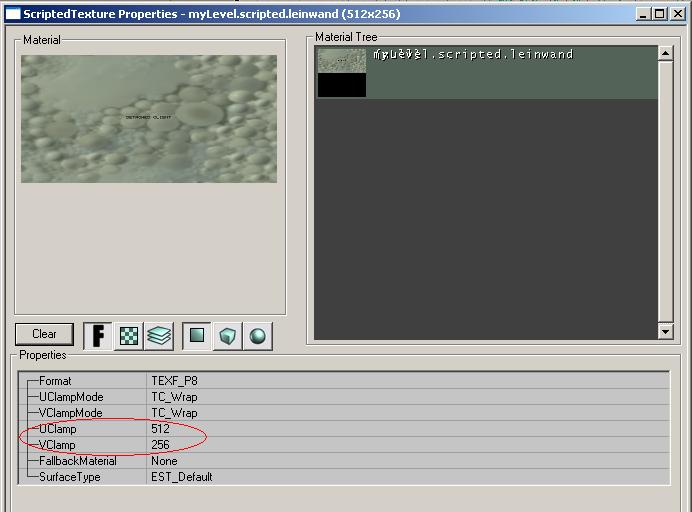
Rightclick the texture
in the browser > properties
Apply Uclamp and Vclamp to your likings (power of 2 please).
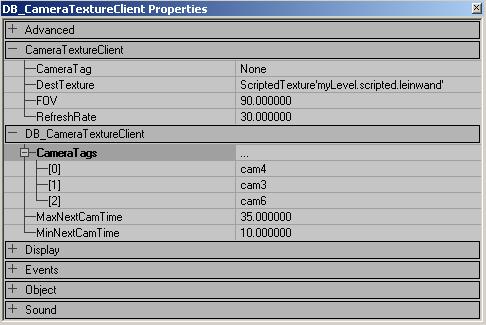
Now put the texture
in your desired place and add a DB_CameraTextureClient (Info>CameraTextureClient)
As DestTexture use your scripted texture.
Set Field of View and Refresh Rate (default of 60 is insanely
high, I suggest something like 24 or 30)
Now you can add multiple cameras, just enter the tags of the DB_CameraScripts
there.
The screen will toggle thru these. It will switch at a random time, you can
set a min and a max value (in this case 10s-35s).
10.Team
Jump Pads
It can be found where all other jumppads are, in the properties you need
to set the team that is allowed to use it. Rest is like a normal Jumppad. (0
= red, 1 = blue)
11.Design Hints, by Deathball Lead Designer David Münnich
A few design and
composition hints.
-Don't try to make the gameplay with your map. There are few crazy maps that
work and are fun.
Deathball itself is making the gameplay, not the map (as in Deathmatch for example).
You basically just have to give Deathball an empty map to make it shine.
Putting in lots of crazy things didn't work out well so far.
So no pits, no traps, no slopes (they can ruin passes)
and crazy stuff. If you like try it, but I've played many community maps which
tried too much crazy stuff.
They just kill Deathball.
I am not asking you to make empty cubes, there are more possibilites, but don't
go crazy. Just try subtle changes to the original concept.
But it is fun enough to just put the same gameplay arena into new environments,
to create a new atmosphere. You will see, Deathball feels different when you
play in a new arena that looks different, but plays the same. It's like playing
on different football pitches or in different stadiums. It's not like anyone
is asking for different football pitches, they are that boring for 200 years
now, and the sport is still by far no1 in the world :) The fun is coming from
something else.
-Avoid bright side
walls, you won't be able to see your radar, and maybe the ball
-Also avoid grids or glass as side walls. Because you will see the stuff behind,
it distracts too much, and you might not see players or the ball. Have your
walls as plain as possible. You need a good compromise between looks and gameplay.
Going too much for looks can easily kill the map, and nobody will play it.
-Keep your walls flat. Try to keep any detail away from the gameplay arena,
because the ball will bounce off randomly from that stuff.
Nobody likes that in matches, everything should be predictable. I have to be
able to play an exact pass using the wall.
-No tight hallways and not too much stuff on the pitch. This just doesn't work
at all. Keep it easy, too much stuff ruins the game. You need enough room for
passes!
Your main problem should be the enemy, not walls or stuff!
-Keep it flat. Having slanty surfaces here and there can ruin the gameplay.
When you try to pass to someone who is just running onto a new surface, the
pass will go off aim. And this will happen all the time, I promise.
-Keep the radar size at 8192 (from top to bottom). This is just because you
get used to a certain size, if it changes from map to map, you will fuck up
passes for example.
Long passes are always played via the bottom radar. Some people also try to
get the right boost distance on the bottom radar, if the scaling is different,
you will be too far away from the other guy and boosting never works... So if
you can avoid it, use 8192 as size, even if the map is much smaller, just to
have the same feeling for size in every map. If your map is bigger.....well,
then you can't prevent it. But a good map doesn't need to be bigger.
If you are used to DB-Cube, you will get in trouble when you play DB-Touchdown,
because this IS longer, and you will have yourself missing boosts and passes
all the time. That's how I found out about the radar problem. Because everything
I did, didn't work on that map, because of the radar size change.
-Use the high- or superhigh-detail settings (youractor/advance). So when you
set world detail to "low" everything will be gone. Cube is a perfect
example for this, if you use low detail, it's all just for a perfect frame rate.
If you use Normal (default setting) you'll get all details. Especially the big
screen is sucking on your framerate. You can not remove BSP brushes with this,
but static meshes. So try to hide all static meshes if possible. Don't be affraid
that people will not see all the meshes you put in so much work. But in the
end, people only look at them for 5 minutes, and think "cool, but now lets
play, how can I make my framerate better?" So do 'em this favour.
written by David Münnich, Deathball Lead Designer, Project Leader, Level Designer, Teaboy etc.
e-mail: DavidM (at) deathball.net